Biomes: Difference between revisions
Details on meadows animals |
No edit summary |
||
| (16 intermediate revisions by 5 users not shown) | |||
| Line 1: | Line 1: | ||
<imagemap> | |||
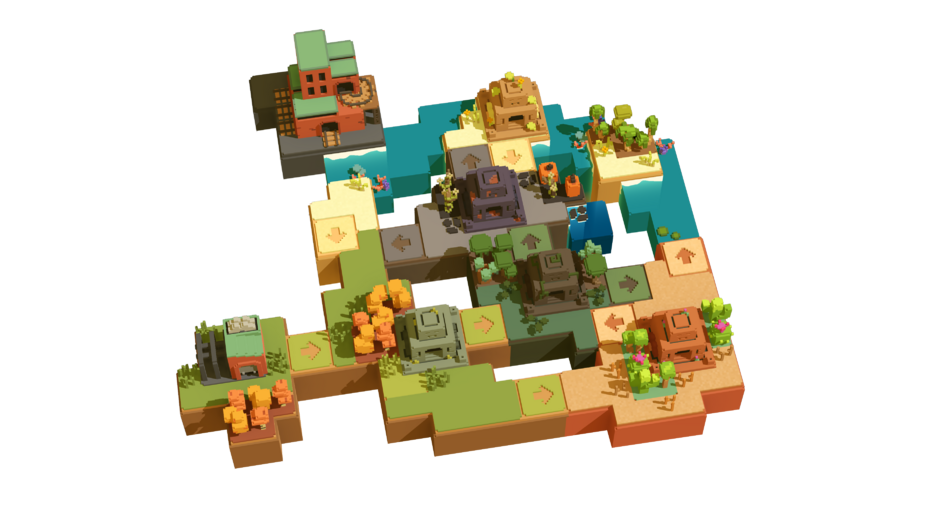
File:Biomes.png|950x514px|Biomes Map | |||
desc bottom-right | |||
</imagemap> | |||
Unrailed 2: Back on Track has six distinct biomes to play on. Each has its own attributes that make the gameplay unique. These attributes come in the form of varying terrain generation, different creatures and a final boss. | |||
Players can choose which biome to start in, but typically starting in Monorail Meadows is the easiest. Players are able to progress between biomes choosing to navigate to the [[Biome Junction Station]] at the cost of {{Bolts|10}}. Navigating to the biome junction is only possible after completing 2+3*(k-1) stations in the current biome, where ''k'' is the number of times you've visited the given biome. Selecting the biome junction will begin the current biome's boss fight. After the player(s) defeat the boss, they can choose to navigate to the subsequent Biomes. | |||
== Biomes == | |||
= | <div id="biome-list"> | ||
<ul> | |||
<li>{{Minify|Badge_Autumn|Monorail Meadows Biome|Monorail Meadows}}</li> | |||
<li>{{Minify|Badge_Swamp|Boxcar Bayou Biome|Boxcar Bayou}}</li> | |||
<li>{{Minify|Badge_Canyon|Cargo Canyon Biome|Cargo Canyon}}</li> | |||
<li>{{Minify|Badge_Island|Island Interchange Biome|Island Interchange}}</li> | |||
<li>{{Minify|Badge_Labyrinth|Loco Labyrinth Biome|Loco Labyrinth}}</li> | |||
<li>{{Minify|Badge_Junkyard|Boiler Badlands Biome|Boiler Badlands}}</li> | |||
<li>{{Minify|Badge_Credits|UnRailD HQ|UnRailD HQ}}</li> | |||
</ul> | |||
</div> | |||
If you wish to visit all biomes without entering a biome twice, there are many possibilities. You can start at any biome and always make sure to visit all biomes on the same layer before transition to the next layer. | |||
* Layer 1: [[Monorail Meadows Biome|Monorail Meadows]] | |||
* Layer 2: [[Cargo Canyon Biome|Cargo Canyon]] & [[Boxcar Bayou Biome|Boxcar Bayou]] | |||
* Layer 3: [[Loco Labyrinth Biome|Loco Labyrinth]] & [[Island Interchange Biome|Island Interchange]] | |||
* Layer 4: [[Boiler Badlands Biome|Boiler Badlands]] | |||
If you start in a layer with multiple biomes, you can also visit the sibling biome as last biome when you exit the layer before at the right biome. E.g | |||
[[Loco Labyrinth Biome|Loco Labyrinth]] -> [[Boiler Badlands Biome|Boiler Badlands]] -> [[Monorail Meadows Biome|Monorail Meadows]] -> [[Boxcar Bayou Biome|Boxcar Bayou]] -> [[Cargo Canyon Biome|Cargo Canyon]] -> [[Island Interchange Biome|Island Interchange]]. You can basically just try to draw a path on the overview map considering all arrows printed. | |||
Here are some typical paths: | |||
=== Path 1 === | |||
{{Icon|Badge_Autumn}} [[Monorail Meadows Biome|Monorail Meadows]], | |||
[[ | {{Icon|Badge_Swamp}} [[Boxcar Bayou Biome|Boxcar Bayou]], | ||
{{Icon |Badge_Canyon}} [[Cargo Canyon Biome|Cargo Canyon]], | |||
{{Icon |Badge_Island}} [[Island Interchange Biome|Island Interchange]], | |||
{{Icon |Badge_Labyrinth}} [[Loco Labyrinth Biome|Loco Labyrinth]], | |||
{{Icon |Badge_Junkyard}} [[Boiler Badlands Biome|Boiler Badlands]] | |||
This is the recommended order to traverse the biomes as the difficulty of the biomes steadily increases in this order. | |||
=== | === Path 2 === | ||
{{Icon|Badge_Autumn}} [[Monorail Meadows Biome|Monorail Meadows]], | |||
{{Icon |Badge_Canyon}} [[Cargo Canyon Biome|Cargo Canyon]], | |||
{{Icon|Badge_Swamp}} [[Boxcar Bayou Biome|Boxcar Bayou]], | |||
{{Icon |Badge_Labyrinth}} [[Loco Labyrinth Biome|Loco Labyrinth]], | |||
{{Icon |Badge_Island}} [[Island Interchange Biome|Island Interchange]], | |||
{{Icon |Badge_Junkyard}} [[Boiler Badlands Biome|Boiler Badlands]] | |||
Players seeking to beat the record may find this path to be better as it allows players to go further in easier biomes with a stronger train. | |||
{{Nav}} | |||
Revision as of 09:54, 8 July 2025
Unrailed 2: Back on Track has six distinct biomes to play on. Each has its own attributes that make the gameplay unique. These attributes come in the form of varying terrain generation, different creatures and a final boss.
Players can choose which biome to start in, but typically starting in Monorail Meadows is the easiest. Players are able to progress between biomes choosing to navigate to the Biome Junction Station at the cost of ![]() 10. Navigating to the biome junction is only possible after completing 2+3*(k-1) stations in the current biome, where k is the number of times you've visited the given biome. Selecting the biome junction will begin the current biome's boss fight. After the player(s) defeat the boss, they can choose to navigate to the subsequent Biomes.
10. Navigating to the biome junction is only possible after completing 2+3*(k-1) stations in the current biome, where k is the number of times you've visited the given biome. Selecting the biome junction will begin the current biome's boss fight. After the player(s) defeat the boss, they can choose to navigate to the subsequent Biomes.
Biomes
If you wish to visit all biomes without entering a biome twice, there are many possibilities. You can start at any biome and always make sure to visit all biomes on the same layer before transition to the next layer.
- Layer 1: Monorail Meadows
- Layer 2: Cargo Canyon & Boxcar Bayou
- Layer 3: Loco Labyrinth & Island Interchange
- Layer 4: Boiler Badlands
If you start in a layer with multiple biomes, you can also visit the sibling biome as last biome when you exit the layer before at the right biome. E.g Loco Labyrinth -> Boiler Badlands -> Monorail Meadows -> Boxcar Bayou -> Cargo Canyon -> Island Interchange. You can basically just try to draw a path on the overview map considering all arrows printed.
Here are some typical paths:
Path 1
![]() Monorail Meadows,
Monorail Meadows,
![]() Boxcar Bayou,
Boxcar Bayou,
![]() Cargo Canyon,
Cargo Canyon,
![]() Island Interchange,
Island Interchange,
![]() Loco Labyrinth,
Loco Labyrinth,
![]() Boiler Badlands
Boiler Badlands
This is the recommended order to traverse the biomes as the difficulty of the biomes steadily increases in this order.
Path 2
![]() Monorail Meadows,
Monorail Meadows,
![]() Cargo Canyon,
Cargo Canyon,
![]() Boxcar Bayou,
Boxcar Bayou,
![]() Loco Labyrinth,
Loco Labyrinth,
![]() Island Interchange,
Island Interchange,
![]() Boiler Badlands
Boiler Badlands
Players seeking to beat the record may find this path to be better as it allows players to go further in easier biomes with a stronger train.
| Quick Navigation |
|---|